

Book Your Appointment Today!
Our staff will reach out to you shortly
Thank you! Your submission has been received!
Oops! Something went wrong while submitting the form.

Watching your gumline recede can be unsettling. You might notice your teeth look longer, or feel a new twinge of sensitivity when you drink something cold. The good news is that gum graft surgery offers a permanent solution. This procedure isn't just about covering an exposed root; it's a strategic step to rebuild a healthy, strong barrier that protects your teeth for the long haul. This guide provides actionable insights into restoring your oral health and achieving a durable, natural-looking gumline.

When you see a gum graft surgery before and after picture, the aesthetic improvement is striking. But the most critical change is the functional restoration happening beneath the surface. Gum recession is a health issue that leaves your tooth roots exposed and vulnerable.
Think of your gums as a protective collar for your teeth. When that collar pulls away, the sensitive root underneath is exposed. Unlike the tough enamel covering the crown of your tooth, the root surface is much softer and not designed for exposure. This can lead to significant oral health problems.
Delaying treatment for gum recession can lead to consequences that go beyond aesthetics. Exposed roots are softer and more porous than enamel, making them highly susceptible to discomfort and damage. Here are the primary risks of untreated gum recession:
Gum grafting directly addresses these risks by rebuilding lost tissue. It is a definitive medical procedure to halt recession and protect your long-term oral health, preventing more complex and costly problems in the future.
Fortunately, gum grafting is one of the most predictable procedures in modern dentistry. The success rate for modern gum graft surgery is over 90 percent, making it a highly reliable method for restoring gum health. With proper care, this is not a temporary fix but a permanent restoration that can last a lifetime.
This guide provides practical information about the surgery, recovery, and what you can expect day-by-day. Our goal is to equip you with the knowledge to make an informed decision for your health. To understand the baseline for healthy gums, consider reviewing our guide on how to know if your gums are healthy.

To understand the real-world impact of gum grafting, nothing is more illustrative than photographs. Examining actual gum graft surgery before and after results provides a clear picture of what the procedure can achieve. These images document a return to both health and proper function.
In a "before" photo, the problem is immediately apparent. The tooth often appears unnaturally long because the gum has receded, exposing the sensitive, often darker, root surface. This is a clear indicator that the tooth has lost its protective seal. In the "after" photo, the transformation is dramatic. The root is covered, the gumline looks healthy and full, and the tooth has regained its strong foundation.
When comparing these images, you are observing both an aesthetic and functional success story. Understanding both aspects helps you appreciate the full value of the procedure.
First, let’s analyze the "before" state. Look for these key signs of advanced gum recession:
Now, turn your attention to the "after" photo, which demonstrates the successful outcome of the graft.
A high-quality "after" photo shows a gumline restored to full health. This transformation is more than superficial; it represents a significant upgrade to your mouth’s defense system against bacteria and decay.
Here's what to look for in a successful result:
The most critical takeaway from any gum graft surgery before and after comparison is the re-establishment of protection. The new tissue acts as a durable barrier, shielding the sensitive root from temperature changes, acids, and decay-causing bacteria.
This visual evidence is invaluable for setting realistic expectations. While the healing process takes time, these final results demonstrate a permanent solution that restores both the appearance and the health of your smile, effectively turning back the clock on gum recession.
While gum grafting adds tissue, some patients require the opposite procedure. To learn more, read our article on gum reduction surgery before and after results.
Gum grafting is not a one-size-fits-all procedure. Your periodontist will select a specific technique based on your individual anatomy, the location of the recession, and the desired outcome. Understanding these options can help you feel more confident in your treatment plan.
The choice of technique is similar to repairing clothing: you wouldn't use the same patch for a small hole in a silk shirt as for a large tear in denim jeans. Similarly, the right type of gum tissue and method are chosen to restore your gumline for optimal health and aesthetics.
This is the gold standard and most common method for treating root exposure. Your palate (the roof of your mouth) has two layers of tissue. For a connective-tissue graft, a small flap is created on your palate to access the softer "under-layer," known as subepithelial connective tissue.
A small piece of this tissue is harvested and then stitched over the area of recession to cover the exposed root. The flap on the palate is then closed. It heals quickly, and most patients report a sensation similar to a minor pizza burn for a few days. This technique is highly successful because the new tissue blends seamlessly with existing gums, creating a strong, natural-looking result.
While a connective-tissue graft is primarily for covering roots, a free gingival graft is used to increase the thickness and strength of the gum tissue itself. This is beneficial for individuals with naturally thin gums, which can make them more susceptible to future recession.
For this procedure, a small piece of tissue is taken directly from the surface layer of the roof of your mouth. This graft is then attached to the area that needs reinforcement. While not its primary purpose, it can provide some root coverage, but its main function is to create a tough band of gum tissue to prevent future problems.
Your periodontist's choice of graft is a strategic decision. The goal is always to provide a long-term, stable solution that not only improves the gum graft surgery before and after appearance but, more importantly, restores the health and resilience of your gums.
The pedicle graft is a technique that uses gum tissue from a tooth adjacent to the one needing repair. This is only an option if you have plenty of healthy, thick gum tissue nearby.
A flap of tissue, or "pedicle," is partially cut away, leaving one edge attached to maintain its original blood supply, which promotes healing. The flap is then gently stretched over to cover the exposed root and stitched into place. Because it uses your own local tissue, the color match is perfect, and you avoid a second surgical site on the roof of your mouth.
For patients who prefer to avoid surgery on the palate, an allograft is an excellent alternative. With this method, the graft material comes from a human tissue bank. This donor tissue is medically processed, sterilized, and prepared to act as a safe and effective scaffold for your own gum tissue to grow into.
This approach eliminates the need to harvest tissue from your palate, often resulting in a more comfortable recovery. It is a highly effective way to achieve root coverage and is particularly useful when a large area or multiple teeth require grafting.
This table provides an at-a-glance comparison of the main types of gum grafts, their best uses, and their primary benefits.
Each technique has a specific application, and the best one for you depends entirely on your clinical situation.
You can learn more about how these procedures contribute to a beautiful smile in our article on cosmetic gum surgery.
Understanding what to expect after your procedure can reduce anxiety and promote a smooth recovery. While each patient's experience is unique, the healing process follows a predictable path. This timeline helps you recognize what is normal and feel confident as your new smile takes shape.
Think of it like nurturing a new plant. The first few days are about protection. The first few weeks are for the roots to take hold. After a few months, it becomes a strong, stable part of the landscape. Your gum graft follows a similar pattern of integration and maturation.
This visual timeline breaks down the key recovery milestones, from the day of surgery to the three-month mark when the graft is fully integrated.
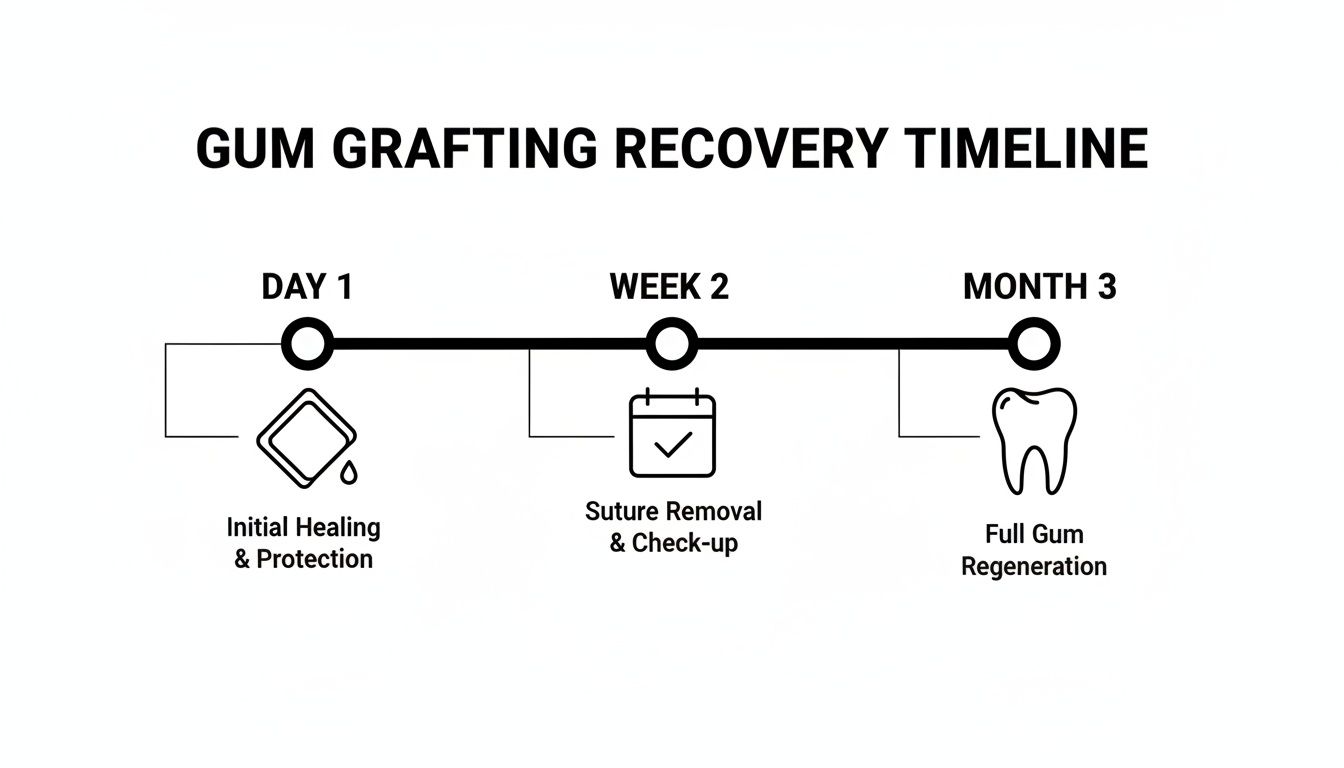
As you can see, the most intensive care occurs in the first week. Major milestones, like suture removal, happen around week two, leading to a stable, healthy result by the three-month mark.
On surgery day, your comfort is our top priority. The procedure itself is painless due to local anesthetic, which completely numbs the area. You will be awake but will not feel anything at the surgical site.
We will meticulously prepare the new tissue and secure it over the receded area with fine stitches. The entire process is designed to give the graft the best possible chance to thrive. You will leave our office with a protective dressing over the site and clear instructions for the first 24 hours.
These first two days are the most critical for healing. Your body’s natural healing response will begin, so expect some swelling, potential bruising, and manageable discomfort. This is all normal.
Your main responsibilities during this time are to rest and protect the graft. This involves:
After the first couple of days, you will start to notice improvements. Swelling typically peaks around day three and then subsides. During this first week, the graft may appear white or yellowish—this is normal. It is not a sign of infection but the surface layer of tissue healing, similar to a scab.
By the end of the first week, discomfort should be significantly reduced. You will have a follow-up appointment around the one-to-two-week mark to check your progress and, in most cases, remove your stitches. The graft is still delicate, so continue to be gentle when cleaning your mouth.
It is essential to avoid touching the graft with your tongue or toothbrush during this period. Protecting the site from any physical disturbance gives it the undisturbed environment it needs to establish a new blood supply and begin integrating with the surrounding tissue.
Once the stitches are out, the graft enters its maturation phase. Over the next several weeks, the tissue will continue to strengthen, thicken, and blend in with your existing gums. The initial discoloration will fade, and the tissue will adopt a healthy, natural pink color.
You can gradually return to a normal diet, but you should still be mindful of the surgical area for a while. By the end of three months, the graft is typically well-integrated and stable. It will look and feel like a natural part of your gumline, providing your tooth root with the necessary coverage and protection. This is when you can truly appreciate the "after" in your gum graft journey.
Once your graft is fully mature, it becomes a permanent part of your mouth. The focus then shifts to maintenance. A landmark 20-year study on gum graft longevity found that with proper care, the results are remarkably stable for decades. The study showed that mean root coverage was 74.23% at one year and remained incredibly high at 67.69% after 20 years. This confirms the procedure's durability, especially for non-smokers who maintain good hygiene. You can explore the full 20-year study on graft stability to review the long-term data.
Long-term success depends on two factors: addressing the original cause of the recession and committing to excellent oral hygiene. A consistent routine of gentle brushing, flossing, and regular dental check-ups will ensure your newly restored gumline remains healthy for life.
Achieving incredible gum graft surgery before and after results depends significantly on your actions during the healing process. Your active participation makes a true difference. While some discomfort is expected, it is highly manageable with a proper plan. This first week is the most critical time to protect the investment in your smile.
A comfortable recovery hinges on controlling inflammation and protecting the delicate new graft. We provide a detailed plan, but your commitment to following it ensures a great outcome. Adhering to these guidelines will directly influence your healing speed and the quality of your final results.
You will experience some discomfort, but most patients find it manageable. The donor site on the roof of your mouth may feel like a minor pizza burn. The key is to stay ahead of the discomfort rather than reacting to it.
A combination of over-the-counter and prescribed medications works best. A proactive approach is essential:
Following a clear set of rules for the first one to two weeks is non-negotiable for protecting your new graft. The tissue requires a calm, undisturbed environment to establish a new blood supply and attach successfully. Here is your guide for the initial recovery period.
Recovery Do's:
The antibacterial rinse is your best defense against infection while you cannot brush the surgical area directly. Swish gently as instructed to clean the site without putting any physical pressure on the delicate graft and stitches.
Recovery Don'ts:
It is normal to have questions when considering a procedure to restore your gum health. Here, we address common patient inquiries about the gum graft surgery before and after journey to help you feel confident and prepared.
Most patients are pleasantly surprised by how manageable the procedure is, often reporting it was less painful than they anticipated. During the surgery, the area will be completely numb, so you will not feel anything.
Post-operative discomfort is typically managed well with a combination of over-the-counter pain relievers and any prescribed medication. If tissue was taken from the roof of your mouth, you might experience a sensation similar to a minor pizza burn for a few days, which fades quickly. Following aftercare instructions is the best way to ensure a smooth, comfortable recovery.
A successful gum graft is a permanent solution, not a temporary patch. Its longevity depends on two key factors: addressing the original cause of the recession (e.g., switching to a soft-bristled toothbrush) and maintaining excellent oral hygiene moving forward.
With regular dental visits and good daily habits, the new tissue will become a sturdy, fully integrated part of your gums, providing lasting protection for your tooth roots for many years.
It's a common myth that a gum graft is just a temporary fix. With a success rate well over 90%, it’s a permanent restoration of your gumline as long as you maintain good oral hygiene after the surgery.
Gum graft failure is very rare, but it is important to know the signs. In the unlikely event that a graft does not integrate properly, there is no need to panic. The primary indicators would be the graft shrinking significantly or appearing to pull away from the tooth.
We will monitor your healing closely during follow-up appointments. If a failure occurs, the procedure can almost always be redone successfully. The most important thing is to maintain communication with our office during your recovery—if something feels wrong, call us.
You will see an immediate difference, but the final, ideal result takes time. Immediately after surgery, the area will be swollen, and the graft may appear white or discolored. This is a normal part of the healing process.
It takes several weeks for the new tissue to mature, thicken, and blend seamlessly with the surrounding gums to achieve its final, healthy pink color. The true "after" results seen in photographs are typically visible around the 3 to 6-month mark.
Ready to restore your gum health and transform your smile? The team at Clayton Dental Studio is here to guide you with compassionate, expert care. Visit us at https://www.claytondentalstudio.com to schedule your consultation and take the first step toward a healthier, more confident you.