About Us
Services
Family DentistDental CleaningSame Day CrownsAlignersDental ImplantsTeeth whitening
Meet Dr.LocationPlansBlogContact Us
Book Now

Book Your Appointment Today!

Our staff will reach out to you shortly
If you prefer to speak to a team member, please call 832-889-9090
Thank you! Your submission has been received!
Oops! Something went wrong while submitting the form.

8 Actionable Dental Implant Recovery Tips for a Smooth 2025

8 Actionable Dental Implant Recovery Tips for a Smooth 2025

Congratulations on taking a significant step toward restoring your smile with dental implants. The surgical procedure is just the beginning; the real key to long-term success lies in a smooth, well-managed recovery. This healing phase is critical for osseointegration, the biological process where the implant post fuses securely with your jawbone, creating a stable foundation for your new tooth. A successful recovery doesn't just happen on its own; it requires careful attention and proactive care.

This guide is designed to be your comprehensive resource, moving beyond generic advice to offer specific, actionable dental implant recovery tips. We understand that patients in Humble and Atascocita are looking for clear, practical guidance. We will break down your healing journey into manageable steps, covering everything from immediate post-operative care in the first 72 hours to navigating the weeks that follow.

Inside, you will find detailed strategies for managing pain and swelling, essential dietary modifications for optimal healing, and precise instructions for maintaining oral hygiene without disturbing the surgical site. We will also cover activity restrictions, medication compliance, and crucial lifestyle adjustments, like avoiding smoking and alcohol. Think of this as your complete roadmap to not only minimize discomfort but also to prevent complications and ensure your dental implant investment provides a lifetime of confident smiles. Let's dive into the essential tips that will put you in control of your healing process.

1. Master Your Oral Hygiene and Implant Site Care

Following your dental implant surgery, your primary goal is to foster an environment where healing can occur undisturbed. Meticulous oral hygiene is the cornerstone of this process, directly impacting the success of osseointegration, where the implant fuses with your jawbone. This practice prevents infection, reduces inflammation, and ensures the surgical site remains pristine, which is why it's one of the most critical dental implant recovery tips we can offer.

Proper care involves a delicate balance: keeping the area clean without disrupting the fragile healing tissues or the crucial blood clot that forms in the first 24 hours. Aggressive cleaning can lead to complications, while neglect can introduce harmful bacteria, potentially causing an infection or even implant failure.

Tip 1: Master Your Oral Hygiene and Implant Site Care

Actionable Steps for Implant Site Hygiene

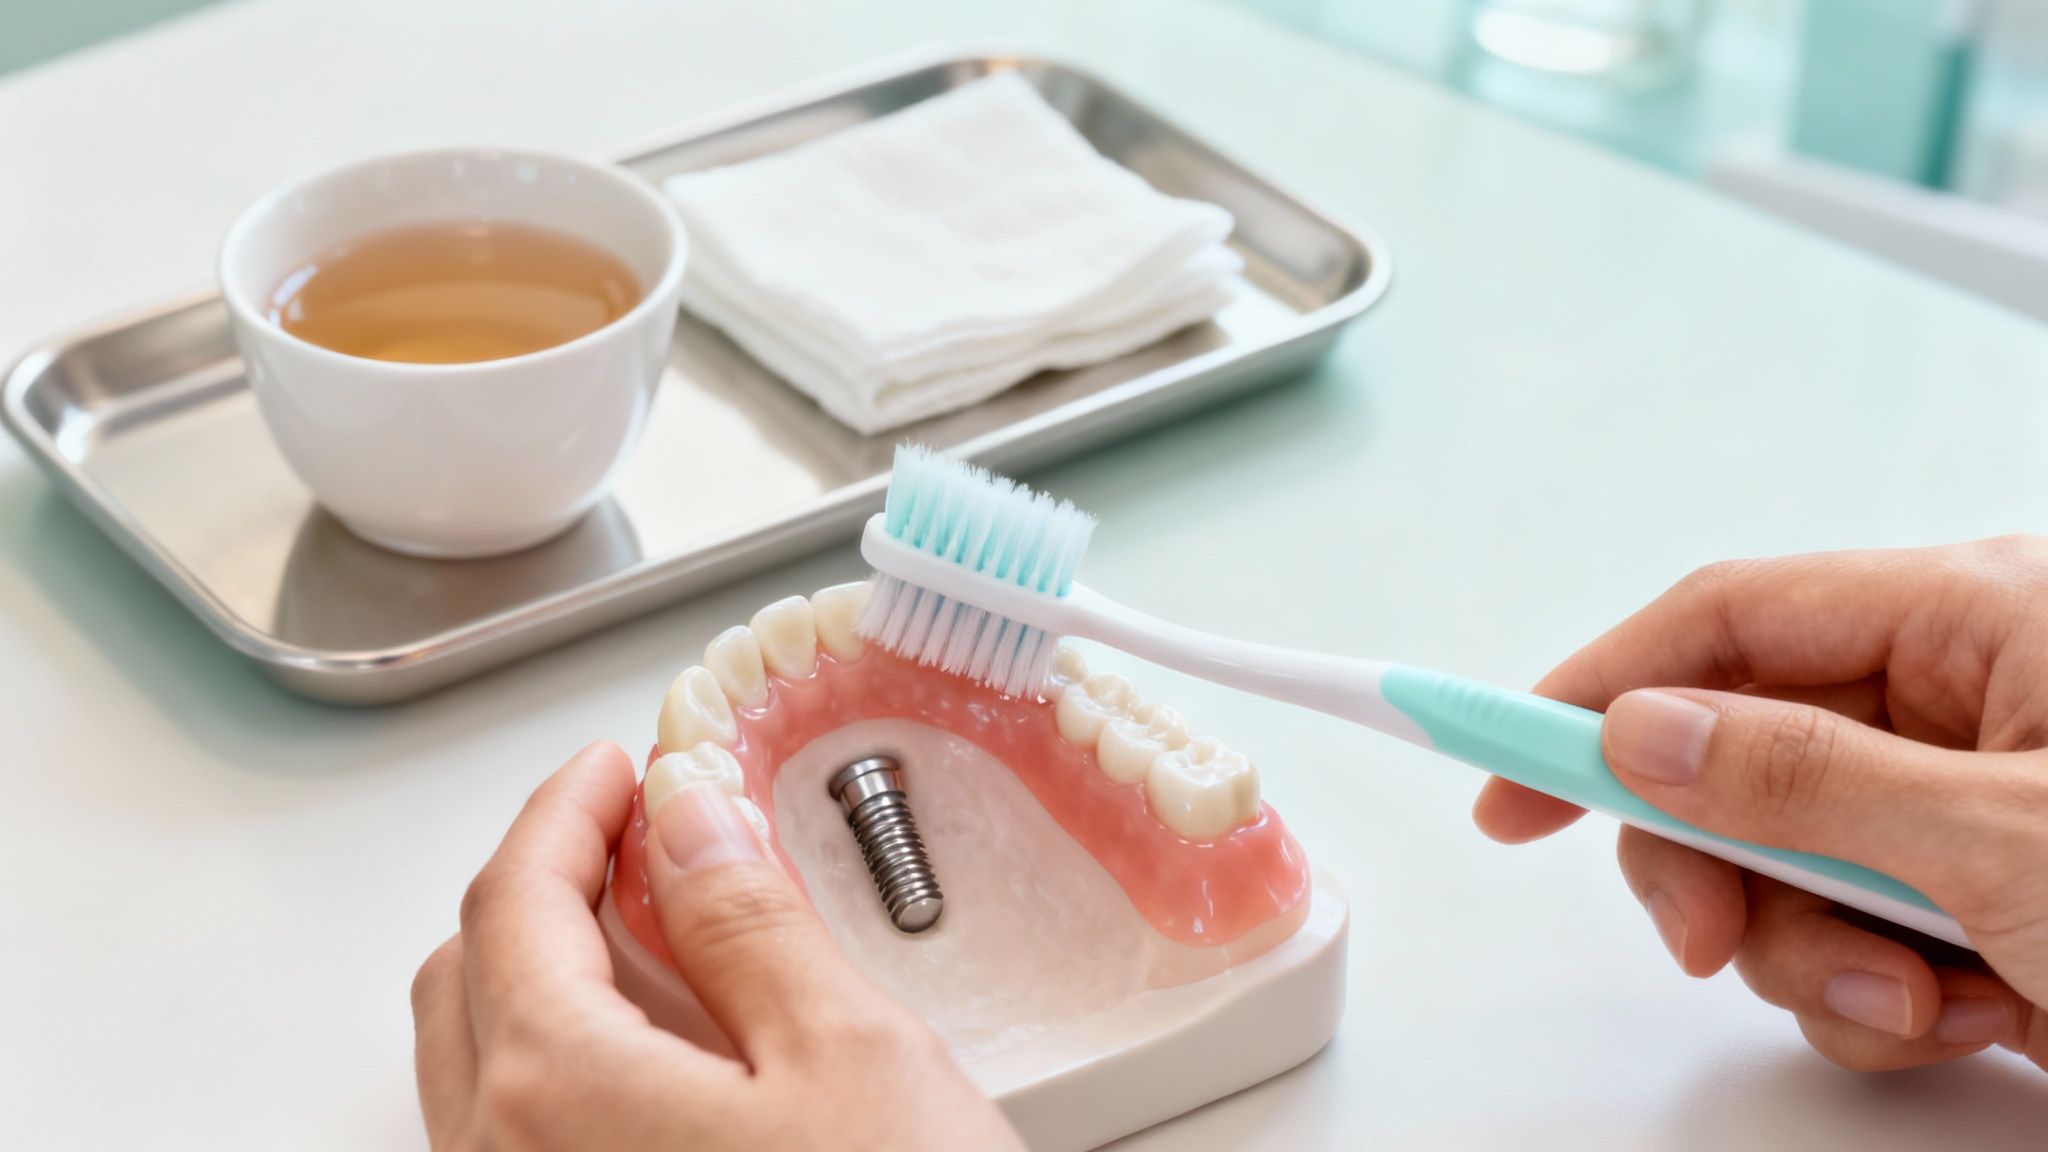
To effectively manage your oral hygiene post-surgery, follow these specific guidelines. These steps are designed to protect the implant site while maintaining overall oral health.

  • Wait 24 Hours Before Rinsing: For the first day, avoid all rinsing, spitting, or swishing. This allows a stable blood clot to form, which is nature's protective dressing for the surgical wound.
  • Implement Gentle Saltwater Rinses: After the initial 24-hour period, you can begin rinsing. Dissolve a half teaspoon of salt in an 8-ounce glass of warm water. Gently let the solution flow over the surgical site by tilting your head side to side. Do this 3 to 4 times a day, especially after meals, to remove food particles and reduce bacteria.
  • Use Prescription Rinses as Directed: If Dr. Clayton has prescribed an antimicrobial mouth rinse like chlorhexidine, use it exactly as instructed. This rinse is a powerful tool against bacteria but should not be used as a substitute for gentle physical cleaning of the surrounding teeth.
  • Avoid the Surgical Site: When brushing your other teeth, be extremely careful around the implant area. You can gently brush the adjacent teeth, but avoid direct contact with the implant, healing abutment, or sutures for the first several days.
  • Hands-Off Policy: Resist the urge to touch the surgical site with your fingers or tongue. This can introduce bacteria and disturb the healing tissues.

By mastering these hygiene techniques, you are not just cleaning your mouth; you are actively participating in the long-term success of your restoration. Proper care is fundamental to ensuring your implants can last for decades. Explore more about the factors that influence the longevity of your dental implants.

2. Ice Application for Swelling Management

Following dental implant surgery, managing swelling is a key component of a comfortable recovery. Strategic ice application is one of the most effective, non-medicinal dental implant recovery tips for minimizing inflammation and discomfort. Applying cold to the area constricts blood vessels, which in turn reduces blood flow, alleviates swelling, and numbs the nerve endings to provide pain relief. This simple action is most crucial within the first 48 hours post-op.

Controlling inflammation isn't just about comfort; it's about promoting a better healing environment. Excessive swelling can put pressure on the surgical site and surrounding tissues, potentially slowing down the recovery process. By proactively managing it with ice, you help your body focus its energy on healing the implant site efficiently.

Ice Application for Swelling Management

Actionable Steps for Effective Icing

To harness the full benefits of cold therapy without risking skin irritation, follow this proven method. Consistency during the initial recovery phase is vital.

  • Start Immediately: Begin applying ice as soon as you get home from your procedure. The sooner you start, the more effective you will be at preventing swelling from developing in the first place.
  • Protect Your Skin: Never apply ice or a frozen pack directly to your skin. Wrap the ice pack in a thin towel or cloth to create a protective barrier. This prevents ice burns and tissue damage.
  • Follow the 20/20 Rule: Apply the ice pack to the outside of your cheek, over the surgical area, for 20 minutes. Then, remove it for at least 20 minutes to allow the skin and underlying tissues to return to normal temperature.
  • Maintain the Cycle: Repeat this 20-minutes-on, 20-minutes-off cycle as much as possible while you are awake for the first 24 to 48 hours. This consistent application is the most effective way to manage post-operative swelling.
  • Know When to Switch: After 48 hours, the primary benefit of ice diminishes. At this point, you can switch to a warm, moist compress if you still have some discomfort or stiffness. Heat helps increase circulation to the area, which can promote further healing.

By diligently applying ice, you are taking a simple yet powerful step to make your recovery smoother and more comfortable. This foundational care helps set the stage for successful healing and integration of your new dental implant.

3. Dietary Modifications and Nutritional Support

What you eat after dental implant surgery is just as important as how you care for the surgical site. Proper nutrition provides the building blocks your body needs for tissue repair and bone fusion, while a smart dietary plan protects the implant from excessive pressure and contamination. This is why following specific dietary guidelines is one of the most impactful dental implant recovery tips for a smooth and successful healing process.

Adopting a modified diet helps in several ways: it minimizes chewing, prevents food particles from lodging in the wound, and ensures you receive adequate vitamins and minerals to support osseointegration. Moving from liquids to soft foods, and eventually back to a normal diet, is a phased approach that aligns with your body's healing timeline, preventing setbacks and promoting optimal recovery.

Dietary Modifications and Nutritional Support

Actionable Steps for a Healing-Focused Diet

To nourish your body and protect your investment, follow this progressive dietary plan. These steps are designed to support healing from the first day through the first several weeks post-surgery.

  • Week 1 (Liquids and Purees): Focus exclusively on liquids and very soft, puree-style foods that require no chewing. This protects the delicate surgical site. Think protein smoothies, Greek yogurt, applesauce, lukewarm soups, bone broth, and mashed potatoes.
  • Weeks 2-4 (Soft Foods): As the initial tenderness subsides, you can introduce soft foods that are easy to chew away from the implant site. Good options include scrambled eggs, soft-cooked pasta, oatmeal, flaky fish like salmon, and well-cooked ground meats.
  • Week 4+ (Gradual Reintroduction): You can begin slowly reintroducing more of your normal diet. However, continue to avoid very hard, crunchy, or chewy foods (like nuts, hard candies, or tough steak) for at least 6-8 weeks, or as advised by Dr. Clayton. These can place undue stress on the integrating implant.
  • Prioritize Key Nutrients: Ensure your diet is rich in protein (for tissue repair) and Vitamin C (for collagen synthesis). Aim for 50-75 grams of protein daily through sources like protein shakes, eggs, and soft fish.
  • Stay Hydrated and Avoid Irritants: Drink plenty of water to stay hydrated and aid healing. Crucially, avoid using straws for the first week, as the suction can dislodge the essential blood clot. You must also avoid alcohol and smoking, as they severely impede the healing process.

By carefully managing your diet, you provide your body with the fuel it needs to heal efficiently while protecting the new implant from physical stress. This nutritional strategy is a simple yet powerful way to ensure a predictable and successful outcome.

4. Pain Management and Medication Compliance

Effective pain management is a proactive, not reactive, part of your recovery. Staying ahead of discomfort allows your body to focus its energy on healing rather than responding to stress and pain signals. Proper use of prescribed and over-the-counter medications is one of the most vital dental implant recovery tips because it ensures you remain comfortable, get better rest, and reduce overall inflammation at the surgical site.

The goal is to manage discomfort before it becomes severe. Waiting until pain is intense makes it much harder to control and can disrupt your healing progress. By adhering strictly to the medication schedule provided by your dentist, you maintain a consistent level of relief, which prevents pain escalation and promotes a smoother, more tolerable recovery experience.

Actionable Steps for Managing Post-Surgical Pain

To effectively control discomfort and support healing, follow this strategic approach to medication. These guidelines are designed to maximize relief while minimizing side effects.

  • Stay on Schedule: Take your prescribed pain medication on a strict schedule for the first 24-48 hours, even if you feel you don’t need it. It is far easier to prevent pain from starting than to stop it once it has escalated.
  • Alternate with NSAIDs: Your dentist may recommend alternating your prescription pain medication with an over-the-counter anti-inflammatory like ibuprofen (Advil) or naproxen (Aleve). This combination targets both pain and inflammation, often providing superior relief. A common schedule is taking 600mg of ibuprofen every 6 hours.
  • Take with Food: Pain medications, especially narcotics, can cause nausea or stomach upset. Always take them with a small amount of soft food, like yogurt or applesauce, to prevent this.
  • Avoid Alcohol: Never mix alcohol with pain medications, particularly prescription narcotics or even NSAIDs. This combination can cause dangerous side effects, including liver damage and increased sedation.
  • Transition as Pain Decreases: As your discomfort subsides, begin to transition from prescription medication to over-the-counter options like Tylenol or ibuprofen. This reduces your reliance on stronger medications as your body heals.
  • Know When to Call: While some discomfort is normal, severe or worsening pain after the first 72 hours is not. If your pain is not controlled by the prescribed medication, contact our office immediately.

By diligently managing your post-operative discomfort, you are creating the optimal conditions for your body to heal efficiently. This proactive approach is a cornerstone of a successful recovery. Discover more about our approach to ensuring patient comfort throughout the dental implant process.

5. Follow Activity Restrictions and Rest Protocols

Your body’s ability to heal efficiently after dental implant surgery is directly tied to how much you rest. Adhering to specific activity restrictions is a non-negotiable part of the recovery process. This approach minimizes stress on the surgical site, prevents complications like bleeding or swelling, and allows your body to channel its energy directly into tissue repair and osseointegration. This is why following rest protocols is one of the most impactful dental implant recovery tips for a smooth healing journey.

Limiting physical exertion prevents an increase in blood pressure, which can dislodge the crucial blood clot at the implant site, leading to renewed bleeding and discomfort. Proper rest, particularly with your head elevated, also helps manage swelling and promotes faster healing. Neglecting these guidelines can prolong recovery, increase pain, and in severe cases, jeopardize the implant itself.

Actionable Steps for Rest and Activity Management

To ensure your body has the best possible chance to heal, incorporate these specific restrictions and protocols into your routine. This structured approach to rest will safeguard your investment and support a predictable outcome.

  • Schedule Dedicated Time Off: Plan to take at least 3 to 5 days off from work or school. This period is critical for initial healing and allows you to focus solely on recovery without external pressures.
  • Elevate Your Head: When resting or sleeping for the first 48-72 hours, use extra pillows to keep your head elevated at a 45-degree angle. This simple action helps reduce swelling by promoting fluid drainage away from your face.
  • Avoid Strenuous Movements: For the first week, completely avoid bending over, heavy lifting, or any activity that causes you to strain. These movements can spike blood pressure in your head and disrupt the implant site. Arrange for help with household chores or childcare if possible.
  • Week 2: Continue with light walking.
  • Week 3: Introduce light cardio, such as a stationary bike.
  • Week 4 and beyond: Slowly return to light strength training, but listen to your body and stop if you feel any throbbing or pain.
  • Avoid High-Impact Sports: Stay away from contact sports or activities with a risk of facial impact for at least 3 to 6 months to protect the implant as it integrates with the jawbone.
  • By respecting your body's need for rest and carefully managing your activity levels, you create the optimal environment for your new implant to heal successfully and integrate fully, paving the way for a strong, long-lasting restoration.

    6. Smoking Cessation and Alcohol Avoidance

    Eliminating tobacco and alcohol during your recovery is not just a recommendation; it is one of the most impactful dental implant recovery tips for ensuring the long-term viability of your investment. Both substances directly interfere with the body's natural healing mechanisms, creating a hostile environment for the delicate process of osseointegration. They can significantly increase your risk of complications, including painful infections and complete implant failure.

    Smoking constricts blood vessels, drastically reducing the supply of oxygen and essential nutrients to the surgical site. This starved environment slows down tissue regeneration and weakens the immune response, making you more vulnerable to bacterial infection. Similarly, alcohol dehydrates tissues, impairs blood clot formation, and can negatively interact with prescribed pain medications, posing serious health risks. Committing to abstinence from both is a crucial step in protecting your new smile.

    Actionable Steps for a Smoke-Free and Alcohol-Free Recovery

    To safeguard your implant, it is essential to have a clear plan for avoiding these substances. The following steps are designed to help you navigate this critical period and support a successful healing journey.

    • Be Honest with Your Dentist: Before your surgery, inform Dr. Clayton about your smoking and drinking habits. This allows our team to provide personalized advice and support tailored to your situation.
    • Abstain Immediately Post-Surgery: Do not smoke for a minimum of 72 hours after your procedure, though waiting 1-2 weeks is strongly advised. You must avoid alcohol for at least two weeks, or for as long as you are taking any prescription pain medication.
    • Embrace Nicotine Alternatives: If you are a smoker, discuss nicotine replacement therapies like patches or gum with your primary care physician. These can help manage cravings without exposing the healing site to the harmful effects of smoke.
    • Avoid All Forms of Tobacco and Smoke: This rule applies to cigarettes, cigars, vaping, and chewing tobacco. It is also important to avoid secondhand smoke, as the toxins can still be inhaled and affect your healing.
    • See This as an Opportunity: Use your dental implant recovery as a powerful motivator to make a permanent, positive lifestyle change. The health of your implant for years to come is directly linked to remaining smoke-free.
    • Seek Support: If you struggle with quitting, consider joining a smoking cessation program or seeking support from a healthcare professional. Taking proactive steps to quit significantly increases your chances of a successful outcome for both your health and your implant.

    7. Perfect Your Sleep Positioning and Head Elevation

    How you sleep after dental implant surgery significantly influences the speed and quality of your recovery. Proper sleep positioning, specifically keeping your head elevated, is a simple yet powerful technique to manage two of the most common post-operative side effects: swelling and discomfort. This practice is one of the most effective dental implant recovery tips for a smoother healing process.

    Elevating your head above your heart uses gravity to your advantage. It helps prevent fluid from accumulating around the surgical site, which is the primary cause of facial swelling and throbbing pain. By promoting proper drainage, you not only reduce inflammation but also protect the delicate blood clot essential for healing, ensuring the implant site remains stable and undisturbed throughout the night.

    Actionable Steps for Optimal Sleep Positioning

    To harness the benefits of proper sleep posture, integrate these specific strategies into your nightly routine, especially during the first week after your procedure. These steps are designed to minimize swelling and maximize comfort.

    • Create an Incline: Use two or three pillows to prop up your head and upper back. A wedge pillow, if you have one, is an excellent alternative as it provides a more stable and consistent incline of about 45 degrees.
    • Sleep on Your Back: For the first few nights, make a conscious effort to sleep on your back. This position prevents you from accidentally putting pressure on the implant site or rolling onto the affected side of your face, which could cause pain and disrupt healing.
    • Use a Body Pillow for Support: If you are a natural side-sleeper, place a body pillow or a rolled-up blanket alongside you. This can create a physical barrier that helps prevent you from turning over onto the surgical side during the night.
    • Time Your Medication: If Dr. Clayton has prescribed pain medication, take it about 30 minutes before you plan to go to sleep. This allows the medication to take full effect, helping you fall asleep more comfortably and stay asleep longer.
    • Gradual Transition: Maintain this elevated sleeping position for at least the first 3 to 7 days, or until significant swelling has subsided. Afterward, you can gradually reduce the number of pillows and return to your normal sleeping position as comfort allows.

    By carefully managing your sleep position, you take an active role in controlling post-operative symptoms. This simple adjustment can make a remarkable difference in your comfort levels and contribute directly to a more predictable and successful healing journey.

    8. Prioritize Regular Follow-up Appointments and Professional Monitoring

    Your dental implant journey doesn't end when you leave the surgical suite; it enters a new phase of professional monitoring and care. Scheduled follow-up appointments are a non-negotiable part of the healing process, allowing Dr. Clayton to meticulously track your progress, identify potential issues before they escalate, and ensure the implant is integrating successfully with your jawbone. This professional oversight is one of the most vital dental implant recovery tips for long-term success.

    These visits are your opportunity to have an expert assess the surgical site, confirm that osseointegration is proceeding as expected, and make any necessary adjustments to your recovery plan. Skipping these appointments can mean missing subtle signs of complications, such as minor infection or poor healing, which are far easier to manage when caught early. Consistent professional monitoring safeguards your investment and promotes optimal outcomes.

    Actionable Steps for Your Follow-Up Care

    To get the most out of your post-operative appointments and ensure your recovery stays on track, integrate these proactive steps into your routine.

    • Schedule Before You Leave: Before leaving our office after your surgery, make sure your first follow-up visit is officially on the calendar. This simple step ensures it doesn't get overlooked in the days following your procedure.
    • Prepare Your Questions: In the days leading up to your appointment, jot down any questions or concerns you have. This could be anything from a specific sensation you're feeling to questions about the next phase of restoration.
    • Report Any Changes: Be prepared to discuss your experience. Report any unusual symptoms, no matter how minor they seem, including persistent discomfort, unexpected swelling, or any difficulty with your temporary restoration.
    • Discuss Healing Milestones: Ask Dr. Clayton about your healing progress. Inquire if you are on the expected timeline and what the next milestones are, such as when you can expect the placement of your final crown.
    • Confirm Your Home Care Routine: Use this time to confirm that your oral hygiene routine is effective and appropriate for your current stage of healing. We can provide personalized feedback to optimize your efforts.

    These follow-up visits are a collaborative effort between you and your dental team, designed to guide you smoothly toward a fully restored, functional, and beautiful smile. They also create a seamless transition into a long-term maintenance plan, which includes routine professional cleanings to protect your implant and overall oral health. Discover more about how professional care contributes to a healthy smile with our dental cleaning services.

    8-Point Dental Implant Recovery Comparison

    ItemImplementation Complexity 🔄Resource Requirements ⚡Expected Outcomes ⭐📊Ideal Use CasesKey Advantages 💡
    Proper Oral Hygiene and Implant Site CareModerate — requires daily disciplined technique and learning gentle methods 🔄Low–Moderate — soft brush, antimicrobial rinse, gauze, professional cleanings ⚡High ⭐ — lowers infection risk, promotes osseointegration and faster tissue healing 📊All implant patients, critical first 2 weeks and up to 6 monthsPrevents complications; establishes long-term maintenance; follow prescribed rinses
    Ice Application for Swelling ManagementLow — simple timed application (20/20) 🔄Very Low — ice pack/ice wrapped in cloth ⚡Moderate ⭐ — effective for swelling/pain reduction in first 24–48 hours 📊Immediate post-op period (first 48 hours)Non‑pharmacologic, inexpensive; reduces bruising when used correctly
    Dietary Modifications and Nutritional SupportModerate — staged diet planning and meal prep 🔄Moderate — soft foods, smoothies, possible supplements ⚡High ⭐ — supports immune function, tissue repair and reduces food-related complications 📊Early recovery (1–4 weeks); patients needing higher nutrition supportSupplies nutrients for healing; minimizes implant-site disturbance
    Pain Management and Medication ComplianceLow–Moderate — scheduled dosing and monitoring; tapering required 🔄Moderate — prescribed/OTC meds, monitoring for side effects ⚡High ⭐ — improves comfort, sleep and prevents pain escalation 📊Early postoperative days (most critical 3–7 days)Enables rest and movement; reduces stress on site; follow dosing guidance
    Activity Restrictions and Rest ProtocolsLow — behavior adjustment and planned rest 🔄Low — time off work, household support ⚡High ⭐ — reduces bleeding, swelling and risk of implant displacement 📊Critical first 48 hours to 1–2 weeks after surgerySimple intervention that markedly improves healing outcomes
    Smoking Cessation and Alcohol AvoidanceHigh — significant behavioral change and possible withdrawal 🔄Moderate — cessation aids and support programs ⚡Very High ⭐⭐ — substantially improves implant success and bone integration 📊Smokers/drinkers and all patients during healing (3–6 months min)Major impact on long-term success; reduces infection and failure risk
    Sleep Positioning and Head ElevationLow — adjust sleep posture and use pillows/wedge 🔄Low — extra pillows or wedge pillow ⚡Moderate–High ⭐ — decreases swelling, prevents clot displacement 📊First 2–3 weeks post-op, especially with notable swellingNon‑invasive, low-cost way to improve drainage and comfort
    Regular Follow-up Appointments and Professional MonitoringModerate — multiple scheduled visits and assessments 🔄Moderate–High — clinic time, X‑rays, possible interventions ⚡Very High ⭐ — early detection of complications; optimizes long‑term success 📊All implant patients through integration period (up to 6 months)Professional oversight enables timely interventions and tailored care

    Your Partner in Healing and Long-Term Smile Success

    Navigating the dental implant recovery process is a journey, not a sprint. The comprehensive tips detailed in this guide, from immediate post-operative care to long-term maintenance, are your roadmap to a smooth and successful healing experience. By now, you understand that your active participation is just as critical as the surgical procedure itself. Mastering these recovery protocols is the most powerful investment you can make in the longevity and stability of your new smile.

    Think of your recovery as a partnership. On one side, you have the clinical expertise and advanced technology of your dental team. On the other, you have the power of diligent aftercare. The fusion of these two elements creates the ideal environment for osseointegration, the biological process where your jawbone fuses with the implant, forming a rock-solid foundation for your new tooth. Neglecting even one aspect, such as proper oral hygiene or dietary restrictions, can compromise this delicate process and impact the final outcome.

    Key Takeaways for a Seamless Recovery

    To distill this guide into its most crucial components, let's revisit the cornerstones of your healing journey. These are the non-negotiable actions that form the bedrock of successful dental implant recovery.

    • Proactive Swelling and Pain Management: Diligent use of ice packs in the first 48 hours and strict adherence to your prescribed medication schedule are your first line of defense. This isn't just about comfort; it's about controlling inflammation to promote optimal healing conditions.
    • Meticulous Oral Hygiene: Keeping the surgical site clean without disturbing it is a delicate balance. Your commitment to gentle saltwater rinses and careful brushing of surrounding teeth prevents infection, a primary threat to implant success.
    • Strategic Rest and Nutrition: Your body needs resources to heal. Prioritizing rest, elevating your head while sleeping, and fueling yourself with soft, nutrient-dense foods provide the essential building blocks for tissue repair and bone integration.
    • Open Communication: Your recovery is unique. Never hesitate to communicate with your dental team if something feels off. Recognizing the difference between normal healing and potential complications is vital, and we are here to provide that clarity.

    Following these dental implant recovery tips isn't just about getting through the next few weeks; it's about safeguarding an investment that can enhance your quality of life for decades. Your new implant is designed to look, feel, and function like a natural tooth, and your diligence now ensures you can enjoy those benefits to the fullest. You are not just healing from a procedure; you are laying the groundwork for a future of confident smiles, comfortable meals, and improved oral health.

    Embrace this recovery period as a crucial phase of your smile transformation. Each careful meal, gentle rinse, and restful night is a step toward the final, beautiful result. Your commitment to this process, combined with our professional oversight and support, is the ultimate formula for a healthy, resilient, and brilliant new smile that stands the test of time.


    Ready to begin your journey to a permanent, confident smile or have questions about your recovery? The expert team at Clayton Dental Studio is here to provide personalized guidance and state-of-the-art implant solutions for families in Humble, Atascocita, and the greater Houston area. Schedule your consultation today to see how our patient-centered approach can restore your smile with precision and care.

    Call Now 832-889-9090
    TAP TO CALL
    Visit Us Today!
    12235 Will Clayton PKWY, Suite #4, Humble, TX 77346
    Have Questions? 
    Call Us Now at: 832-889-9090
    Support
    DoctorsContact UsLocation & HoursInsurance and Payment
    © 2025 Clayton Dental Studio. All rights reserved. | Sitemap
    DisclaimerAccessibility
    Built by Boost Dentistry